
Scenario: Someone gives you a hardcopy map with a couple of polygons hand drawn on it. They want it in the GIS so you can make a pretty map for them and run some analysis. What do you?
In my opinion, you bascially have three options:
1. Use a digitizing tablet;
2. Eye-ball it off the map – often called ‘heads-up digitizing’ or ‘on-screen digitizing’; or
3. Scan the map, georeference the image and trace the polygons.
I’m going to quickly run throught the third option. For fun let’s call this geotracing. If you don’t have a digitizer it’s probably the best option…besides I’ve never been a fan of the on-screen digimonkey thing.
So as I mentioned above you’ll need to scan the map. Hopefully there aren’t too many maps and the polygons are concentrated in smaller areas that fit nicely on your scanner. I would recommend scanning to JPEG or TIF either will do fine.
Okay now that you have your images saved let’s fire up ArcMAP and launch the GEOREFERENCING toobar. Right click on the main toolbar and select Georeferencing.
Add some topographic layers to your ArcMAP document. Depending on your map, normally roads, water features and contours will work well.
Add the image you want to georeference. Don’t worry about ArcMAP complaining about the image missing a spatial reference information.
Using the Zoom tools roughly navigate to the area where the polygon should be added.
On the Georeferencing toolbar select> Fit to Display
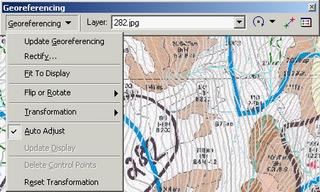
As a personal preference, I also like to have Auto Adjust selected.
Your image should now be visible behind your layer features.
Select the Add Control Points button.
Begin adding control points linking features on your image to the GIS layers. As you add more control points the image will begin to morph and shift to the correct location.
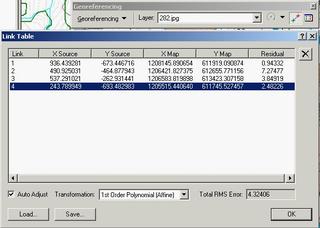
If you added an unlucky control point that you wish to remove you can deleted in the Link Table. Beside the Add Control Points button select the View Link Table button. Select the link you wish to remove and hit the delete button.
Once your are satisifed with how your image lines up to your spatial data, you may wish to save the rectified image. Georeferencing> Rectify… > Save. The rectified image will be saved as a TIF.
Now that the source image is rectified it’s simply a matter of tracing or ‘geotracing’ the polygon(s) of interest. To do this I create an empty polygon shapefile. ArcCatalog> Right Click> New> Shapefile> Name it and select feature type> Polygon. If you know the spatial reference information it would be a good idea to EDIT that information here as well.
Now that you’ve created an empty polygon shapefile, add it to ArcMAP, Start Editing on the EDITOR toolbar and ‘Create a new feature’ by geotracing the polygon on your georeferenced/rectified image. Save Edits, stop editing, et Voila! You probably want to add fields and attribute information to the new polygon(s) but you already know how to do that…don’t you?
In my opinion, you bascially have three options:
1. Use a digitizing tablet;
2. Eye-ball it off the map – often called ‘heads-up digitizing’ or ‘on-screen digitizing’; or
3. Scan the map, georeference the image and trace the polygons.
I’m going to quickly run throught the third option. For fun let’s call this geotracing. If you don’t have a digitizer it’s probably the best option…besides I’ve never been a fan of the on-screen digimonkey thing.
So as I mentioned above you’ll need to scan the map. Hopefully there aren’t too many maps and the polygons are concentrated in smaller areas that fit nicely on your scanner. I would recommend scanning to JPEG or TIF either will do fine.
Okay now that you have your images saved let’s fire up ArcMAP and launch the GEOREFERENCING toobar. Right click on the main toolbar and select Georeferencing.
Add some topographic layers to your ArcMAP document. Depending on your map, normally roads, water features and contours will work well.
Add the image you want to georeference. Don’t worry about ArcMAP complaining about the image missing a spatial reference information.
Using the Zoom tools roughly navigate to the area where the polygon should be added.
On the Georeferencing toolbar select> Fit to Display

As a personal preference, I also like to have Auto Adjust selected.
Your image should now be visible behind your layer features.
Select the Add Control Points button.

Begin adding control points linking features on your image to the GIS layers. As you add more control points the image will begin to morph and shift to the correct location.
If you added an unlucky control point that you wish to remove you can deleted in the Link Table. Beside the Add Control Points button select the View Link Table button. Select the link you wish to remove and hit the delete button.

Once your are satisifed with how your image lines up to your spatial data, you may wish to save the rectified image. Georeferencing> Rectify… > Save. The rectified image will be saved as a TIF.
Now that the source image is rectified it’s simply a matter of tracing or ‘geotracing’ the polygon(s) of interest. To do this I create an empty polygon shapefile. ArcCatalog> Right Click> New> Shapefile> Name it and select feature type> Polygon. If you know the spatial reference information it would be a good idea to EDIT that information here as well.
Now that you’ve created an empty polygon shapefile, add it to ArcMAP, Start Editing on the EDITOR toolbar and ‘Create a new feature’ by geotracing the polygon on your georeferenced/rectified image. Save Edits, stop editing, et Voila! You probably want to add fields and attribute information to the new polygon(s) but you already know how to do that…don’t you?
ไม่มีความคิดเห็น:
แสดงความคิดเห็น